Most of the SAP'ers first questions would be, What does NWBC stands for? well, Netweaver Business Client is the full form on acronym NWBC.
NWBC vs SAP GUI:
NWBC is a desktop client just like SAP GUI which can be used as a one stop shop to logon any SAP systems available for that client similar to GUI but has additional use cases compared to NWBC.
Using Single Sign On concept you can access multiple systems transactions using single log on. Also described as Access to one main systems and casual access to other systems. It can be used to access Dialog Transactions, Webdynpro Applications, Portal based applications, Mobile applications and many more at one place. In easy terms, it means that we will have the ability to integrate multiple UI technologies into a single client.
Simple difference between NWBC and SAP GUI is the way you can access Webdynpro Application. Using SAP GUI, when you execute WD application it opens in a browser whereas on NWBC it opens within the GUI just like a normal dynpro transaction if that application is added to your role.
NWBC works on Role based access. That is, when you log in to particular system using NWBC, you will see only those transactions in the roles assigned to you and also basically, NWBC look and feel is defined using roles.
NWBC Releases:
So far SAP has released 3 versions of NWBC which are, 3.0, 3.5 and 4.0. All the screen shots and notes in my blog are from 3.5 version. One main difference between 3.5 and 4.0 is, to be able to use NWBC 4.0, you should have latest version of GUI which is 740.
NWBC Types:
There are 2 types of NWBC versions, one is Desktop Based and the other is HTML based. HTML based is where we can access NWBC using web browser and Desktop based needs Application needs to be installed on our machines.
NWBC Screen glimpses:
Let me try to show as how does it look when you login to NWBC and what are each sections called using some screen shots,

There are 4 main sections,
1. Navigation Panel (Left Side Panel)
2. Navigation Tabs (Tabs on the top to navigate through various folders)
3. Canvas - Actual section where we see the transaction.
4. Quick Launch bar - It would be generally above Navigation Tabs.
Just like on your browser where you can Hide/Show various sections/add-ons, even in NWBC we have the option to hide most of the sections in the Personalize option.
How to Configure/Set-up NWBC:
Now, coming to the key point of this blog as how to configure/setup an NWBC for your client, NWBC is a free software which can be downloaded from Service Market place. To be able to use NWBC for your system, one particular service needs to be activated on your system using SICF transaction which is, /sap/bc/nwbc and its components under it.

Note: Before activating this service, there are other generic settings for an SAP system like FQDN set-up, HTTP setting for the system etc which are common to get Webdynpro and other web related applications work which are mostly done during initial system set-up itself.
Once you have this service activated, next step is to set-up roles as per business scenario using PFCG transaction.
Setting up Roles:
Step 1: Create Role using PFCG.

Step 2: Maintain Menu Item in the role. Key point to remember when setting up Menu is, You have to first create a folder and then add Transactions inside that folder, only then those tcodes show up in the folder of NWBC.

Step 3: Now, add Transactions, Webdynpro applications, HTML pages and many more inside the folders.

Step 4: Assign User to this Role: Click on the User Tab and add the user name to whom this role needs to be added.

That completes list of basic steps performed to configure NWBC. When you login to this system through NWBC, it would look some what similar to the screen shown below:

SAP did provide many options to customize even particular folder. In PFCG transaction, when you double click a particular folder it will show you all the options to customize even the folder,

Also, in PFCG, Menu Tab where you add folders, you have lot of other options too shown below which can also be used to customize NWBC look.

Side Panel Concept on NWBC:
Side Panel is another important concept which is, on your NWBC you can add a Side Panel which will show an option to add your own navigational links on to the right part of the screen which can be viewed on demand basis. This Side Panel can be added specific to your client or also at Role Level in PFCG.
Before I confuse you more, let me show a screen shot of the same :), in the below screen shots I am adding Side Panel to just my login,
On your NWBC login, navigate to Settings, Connections, Side Panel, it will bring up a pop-up where you can add Side Panel to your NWBC client. If you are doing this way, you can just add HTTP links to your side panel. In the below screen shot, I am adding bing.com as a side panel link to my client, once added you can see that a button on the right is added which will open your side panel.

After adding, it looks like:

Adding Side Panel at PFCG Role Level:
Now, I am making a complete folder as a Side Panel on my PFCG Role,
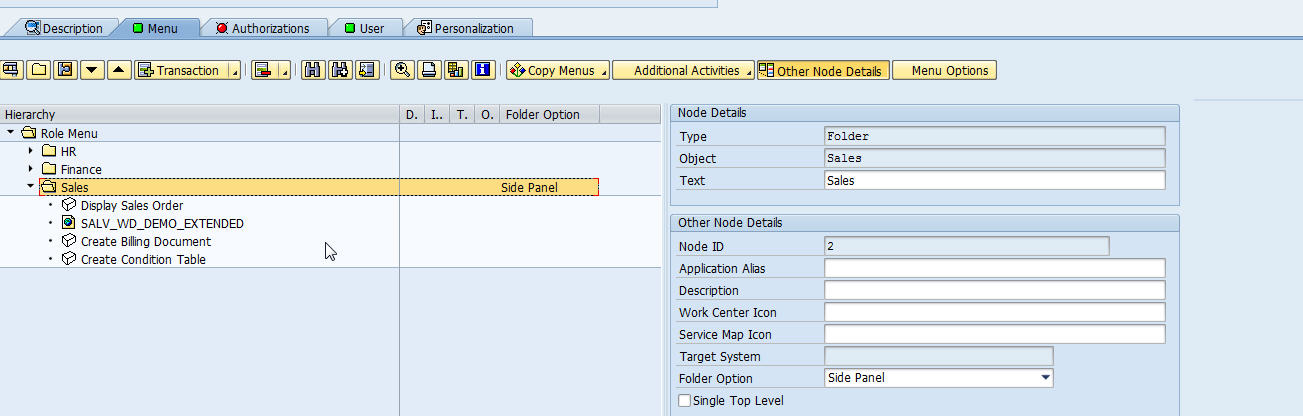
My NWBC looks like, as you can see below I see 2 transactions, one in main canvas and the other in side panel.

As per few blogs I have seen, NWBC does provide an option to access multiple systems thorough single client logic based on Single Sign-On concept of SAP. That is one of the very useful feature which business would be interested as most of SAP clients have more than one SAP system, they would like the option of NWBC to access more than one system using single log on.
Thanks to Julie for her blog on SDN, which has very good information about NWBC:
http://scn.sap.com/docs/DOC-8193


